As an Amazon buyer, you’re flooded with product choices. You visit the marketplace looking for a spatula, and a quick search gives you thousands of kitchen tool options — short, long, plastic, colorful.
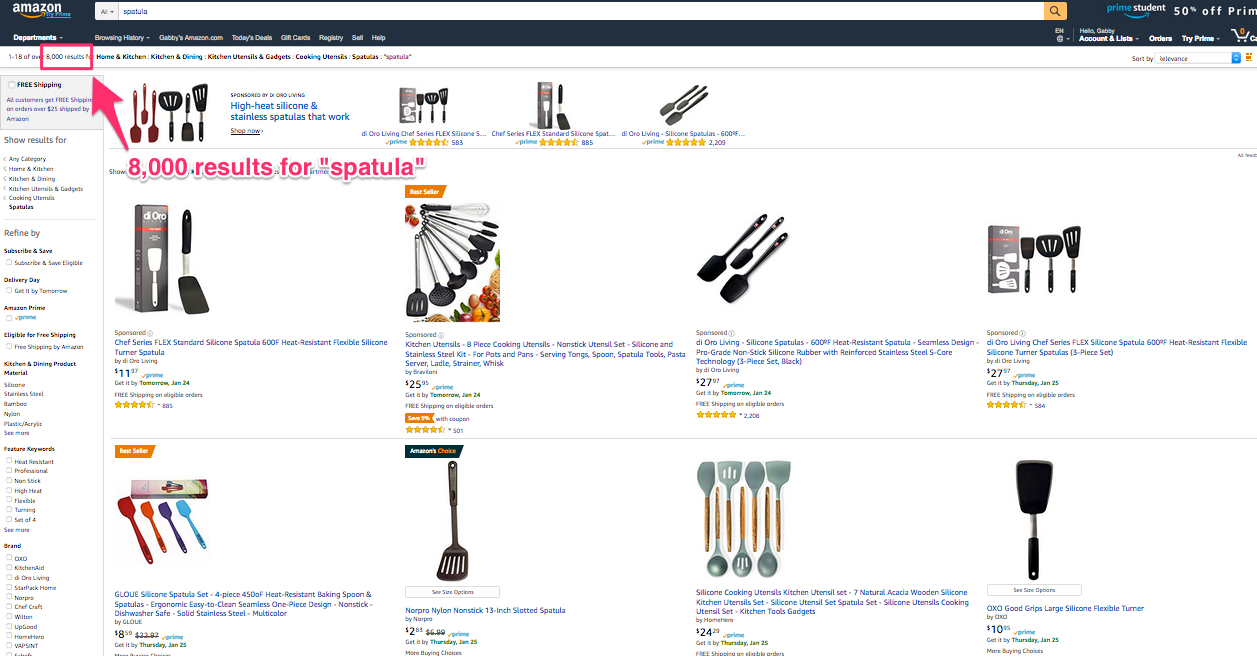
In this sea of merchandise, Amazon sellers have to find a way to make their products stand out if they want to win sales. One of the easiest ways to highlight your items is Amazon PPC.
Amazon pay-per-click (PPC) advertising allows sellers to promote their items directly on the marketplace. The program has grown to become a great way to spread product awareness in recent years. In 2016, sellers using Amazon PPC doubled globally, and PPC clicks grew over 150%.
To help sellers start their first campaign, Sellics has created this comprehensive Amazon PPC guide. This resource offers easy, low-maintenance ways to optimize your Amazon ad spend and keyword selection for greater profits.
Let’s dive in.
A Quick Intro to Amazon PPC
Since launching in 2012, Amazon PPC has made it much easier to increase product exposure and boost sales. It allows all Professional Amazon sellers to advertise their products directly on the marketplace.
Amazon PPC is an advertising arrangement where sellers pay a fee to Amazon when someone clicks their ad (pay-per-click). The most popular type of Amazon PPC ad, ‘sponsored product’, lets you bid on keywords you want your product to rank for in search results. The seller with the highest bid appears as the first search result, the second-highest bid appears as the second result, and so on.
Sellers have three options when choosing the Amazon PPC ad type that makes the most sense for them:
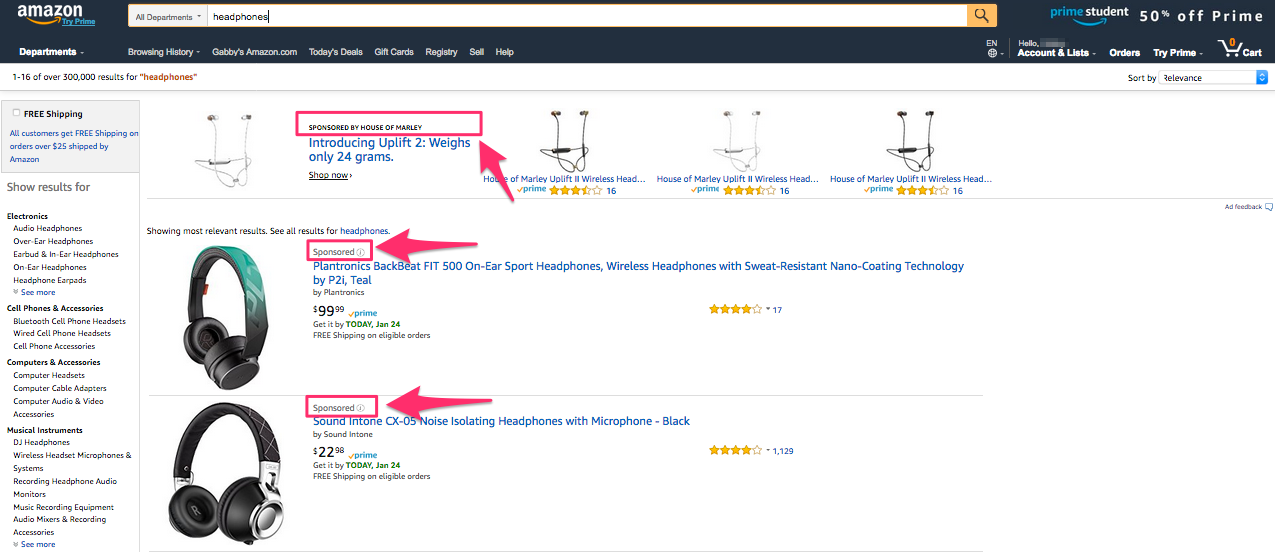
- Amazon Sponsored products ads: keyword and ASIN-based ad type that helps products top the list of Amazon search results based on search terms (similar to Google Adwords). These appear as search results and at the top of product detail pages.
- Amazon Sponsored brands ads: designed to boost brand visibility, these let brands place an ad at the top of the Amazon search results page with a custom headline, logo, and up to three products. Sponsored brand ads show up in different, more valuable positions on the search results page.
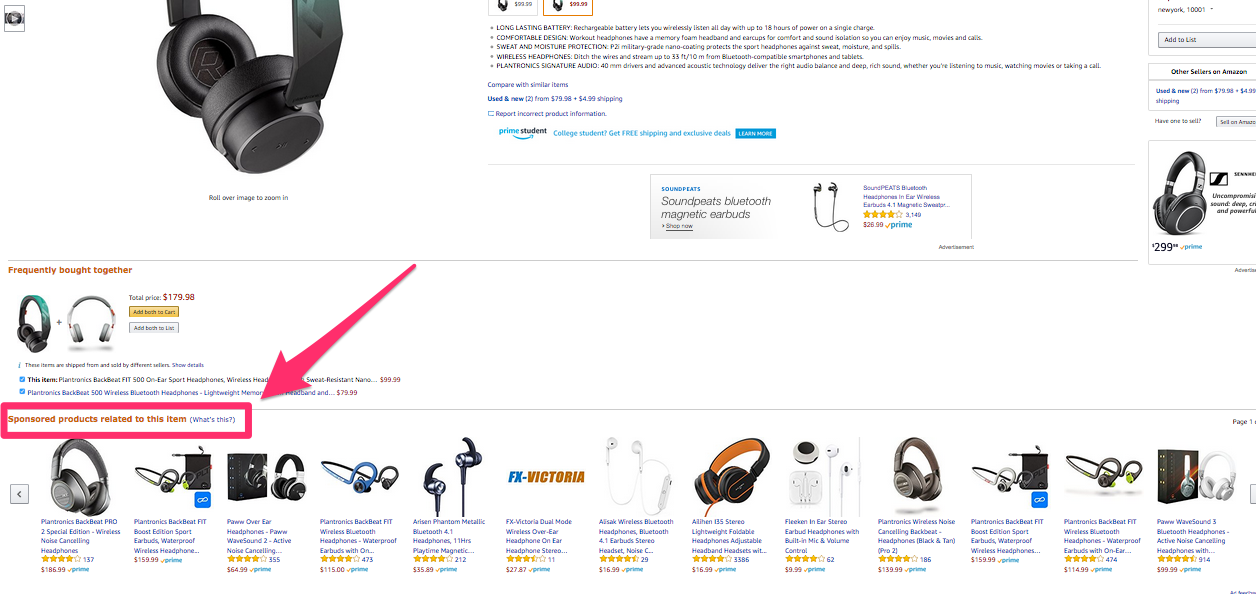
- Amazon Sponsored display ads: the newest Amazon PPC ad option takes shoppers directly to product detail pages and can appear on Amazon as well as external sites based on browsing history/behavior. Ad placements include below the “add to cart” button on product detail pages and on external sites depending on how the ads are targeted.
Amazon PPC ads work because they place your products where most shoppers are. Recent data suggests almost half of Amazon shoppers never look past the second results page. With your items on the first search results page or on a highly-ranked product page, all buyers can easily purchase your products.
Ready to boost your Amazon business with PPC? We’ll walk you through the steps of setting up your first campaign.
Step 1: Decide on your optimal Amazon PPC spend
You can’t set up a campaign unless you know how much you want to bid on your ads. This is pivotal to your overall Amazon PPC strategy. If you don’t budget wisely, you risk compromising the profitability of your Amazon PPC ads.
To calculate your “default bid,” you need to know three metrics:
- Your target ACoS (Advertising Cost of Sale)
- Your product’s price
- Your product’s conversion rate
You shouldn’t have any trouble identifying your product price, and your conversion rate can be easily found through your Seller Central account. The less familiar metric is your target ACoS.
Calculating Your target Advertising Cost of Sale (Acos)
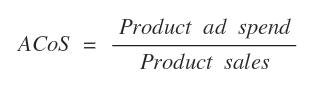
Your ACoS measures the performance of your Amazon PPC campaigns. It’s calculated as a ratio of ad spend to sales.
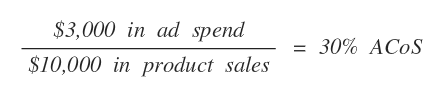
Say you spend $3,000 on ads and generate $10,000 in product revenue. Your ACoS is 30%.
Luckily, you can easily find this ACoS metric for every product in the Campaign Manager section of Seller Central.
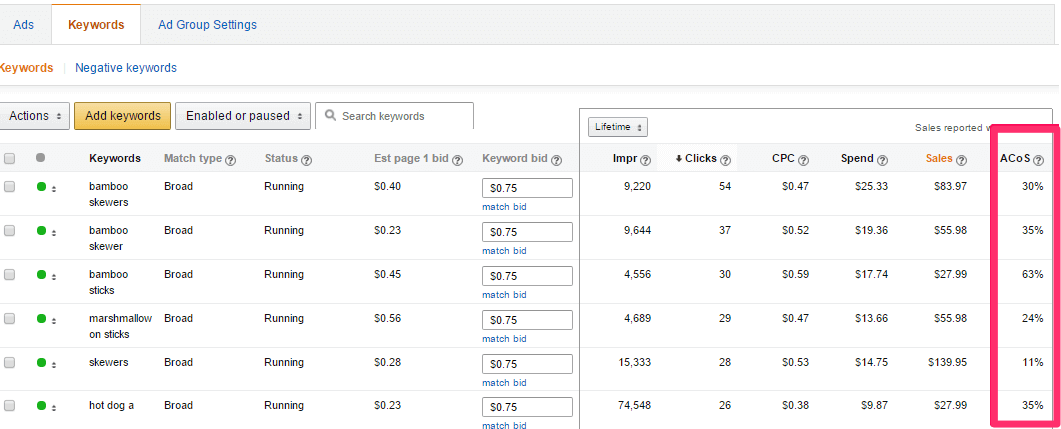
[Source]
ACoS is critical to measure because it directly impacts your profits. All ecommerce sellers want to turn a profit, so your ACoS has to be lower than your profit margin. You’ll incur a loss if your Amazon advertising spend exceeds your revenue.
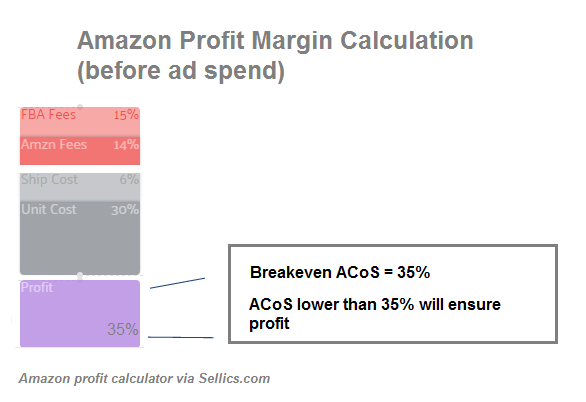
Setting a target ACoS allows you to keep your Amazon PPC ad spend at a profitable level. In the example above, say you want to have a final profit margin of 10% with ad spend included. You would set a target ACoS of 25% to secure these profits.
With a target ACoS set, you can calculate your default bid amount.
Calculating your default Amazon advertising bid
For every Amazon PPC ad, you’ll place a bid for the keywords you want your ads to rank for. It’s a cost-per-click bid, so you’ll pay that amount every time a user clicks on your ad.
Ideally, you want to place a bid that’s high enough to win but low enough to keep your profit margin healthy. With these factors in mind, we’ve laid out the following formula for calculating your default bid for Amazon PPC ads.
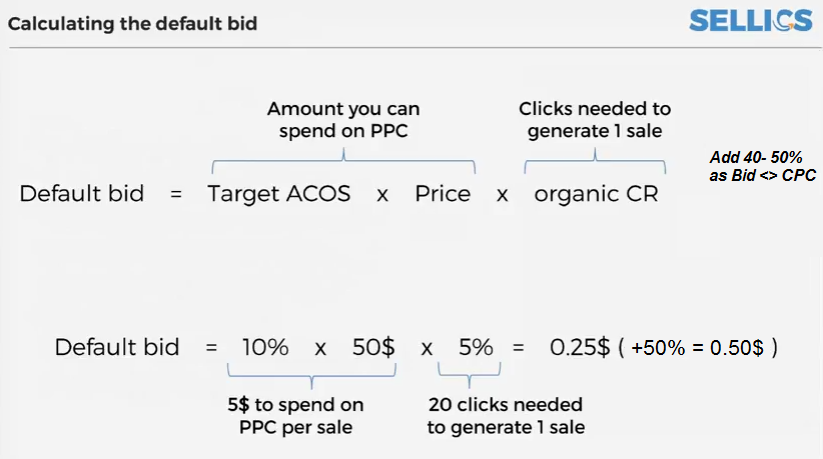
To increase your chances of winning, our formula adds 50% to your default bid calculation. From our research, we’ve found the winning CPC bid is on average 40-50% lower than the winner’s default bid. Because you don’t necessarily pay as high as your bid, it’s better to bid aggressively like this and increase your chances of winning.
Calculate your daily ad budget
Amazon also asks that you set a daily budget for each ad campaign. To calculate this figure, you’ll need to determine a monthly Amazon ad budget that works for your business. We recommend using this guide from BigCommerce to find an Amazon ad budget that works for your business.
With this budget set, you can calculate the daily amount you can spend on your Amazon PPC campaign.

This formula assumes that you’re equally prioritizing every ad campaign. Feel free to adjust based on which campaigns you’d like to devote more resources to. Say you wanted to devote 60% of your monthly budget to one campaign — just multiply your total Amazon daily budget by that percentage.

Using our default bid and daily budget formulas, you’re ready to set up your first campaign with a winning, yet profitable bidding.
Step 2: Optimize your Amazon product listings before starting with Amazon PPC
Before you embark on your first Amazon PPC campaign, double-check that your product listings are optimized to Amazon SEO standards. Amazon uses an algorithm simply referred to as A9 to filter products based on text match relevancy, so having the right keywords in the right places gives you a headstart before you dive into your actual campaign.
Here are some areas where you can tweak your existing Amazon product pages to maximum effect:
- Conduct keyword research (see step 4A below) and use keyword targeting practices throughout product detail pages
- Maximize product titles and descriptions by using target keywords and adhering to character counts
- Select the product category that’s best suited to your audience and product(s)
- Use eye-catching product images to boost click-through rate
These optimizations will make your listings more clickable. Applying these tips to your Amazon product listings before launching your Amazon PPC campaign is crucial. If your product listings have confusing, irrelevant titles and poor image quality, it won’t matter how much you’re willing to spend on Amazon PPC ads— people will be less likely to visit your product pages from the get-go.
Step 3: Start a campaign
Now that you know how much you want to spend on Amazon PPC and optimized your product listings, you’re ready to get started. To launch your first campaign, log in to Seller Central and click “Campaign Manager” under the Advertising subsection.
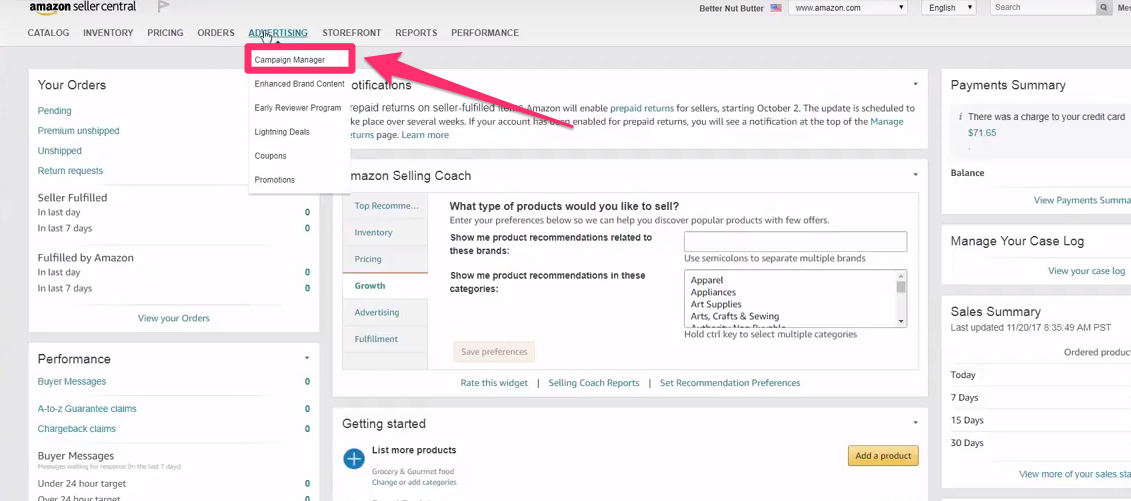
[Source]
From there, you’ll be led to the Campaign Settings page where you set your:
- Ad campaign name
- Daily budget (See Step 1 to calculate)
- Campaign Time Frame
- Targeting type: Automatic or Manual

[Source]
The rest of your campaign setup depends on which targeting type you choose: manual or automatic. Each type brings different benefits:
- Automatic saves you time: Amazon targets your ads based on your product info without you entering keywords.
- Manual gives you more control: You enter the keywords you want your ad to match with.
One type isn’t better than the other — choosing manual or automatic targeting all depends on your business’s marketing strategy and resources. We’ll walk you through how to set up each type so you’re ready to use either type of campaign targeting.

Step 4A: Setting up a manual Amazon advertising campaign
Setting up a manual PPC campaign does take more time and effort than an automatic one, but the tradeoff is big — you gain greater ad targeting precision by choosing the keywords you want your ad to display.
Selecting your ad name, products, and bid
To get started, select Manual as the targeting option on the Campaign Settings page mentioned in Step 2, and click “Continue to next step.”
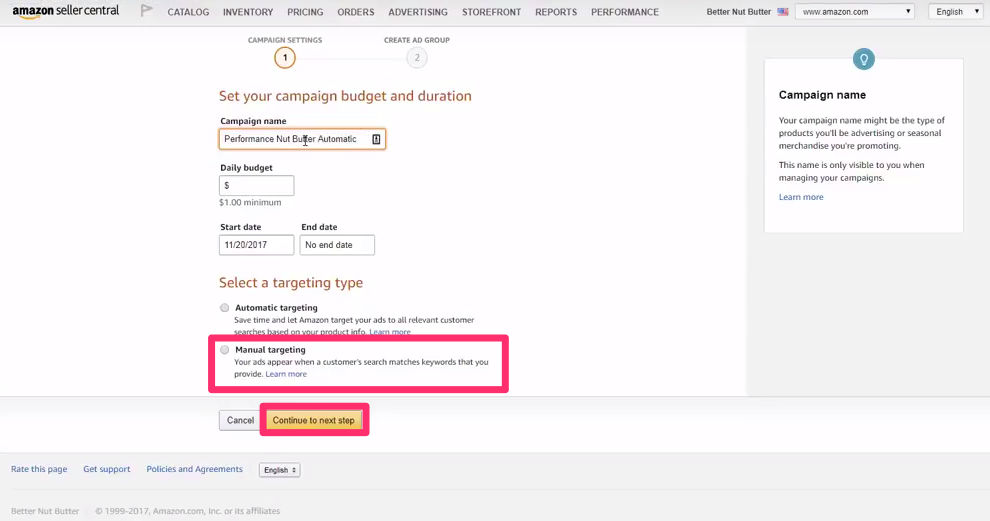
[Source]
From this page, you’ll be prompted to enter your name for this group of ads in the campaign and select the products that you want to advertise.
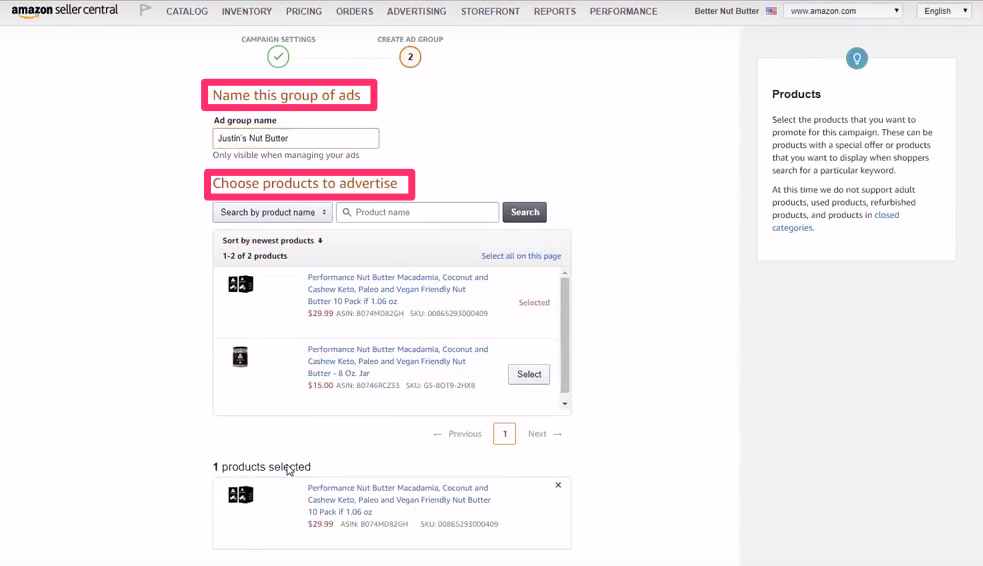
[Source]
After selecting your ad group name and products, you choose your default bid.
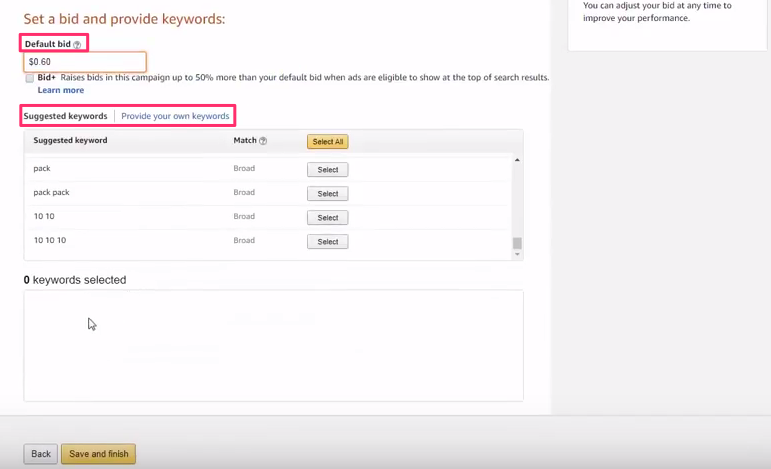
[Source]
Use the formula in Step 1 to calculate your Default Bid amount. Note that you don’t need to select Amazon’s Bid+ option if you use our formula since it already adds 50% to the default bid.
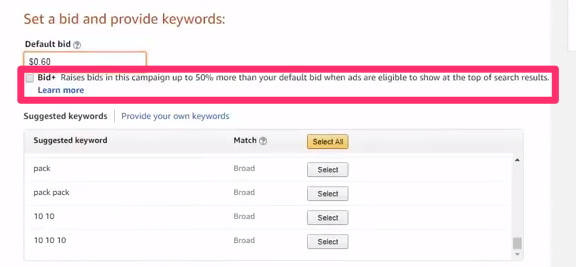
[Source]
Select keywords
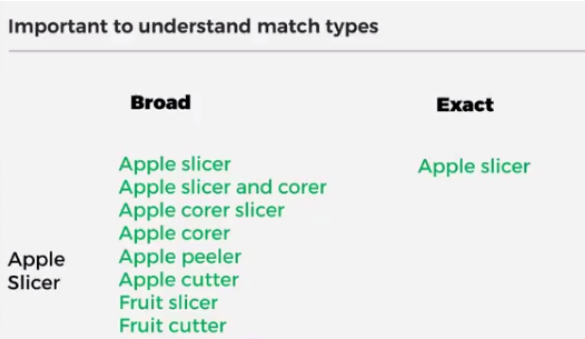
For keywords, you can either use Amazon’s suggestions or provide your own keywords. When adding your own keywords, you have to select a match type:
- Broad match: Your ad can appear when a buyer searches your keyword in any order along with other close variants of your keyword.
- Phrase: Your ad can appear when a buyer searches for your exact keyword with other keywords before and after it.
- Exact: Your ad only appears when a buyer searches for your exact keyword without any other words in the search.
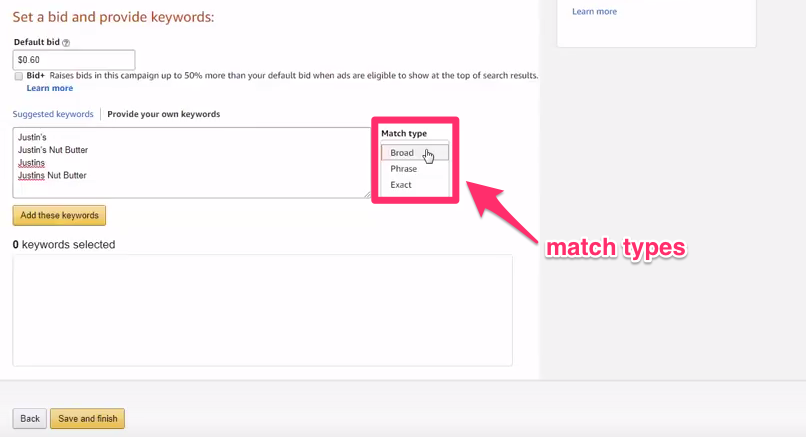
[Source]
Here at Sellbrite, we recommend using Broad and Exact match types only. Based on our internal research, we’ve found that the search terms discovered in your Phrase Ad Group will most likely be found in your Broad Ad Group as well.
Setting up an exact keyword group
With an Exact keyword, your ad will only rank if the keyword is matched exactly without any additional words— so you need to choose the keywords carefully. You only want to bid on relevant keywords that reliably convert for your product.
Here are a few tips for building your Exact keyword group:
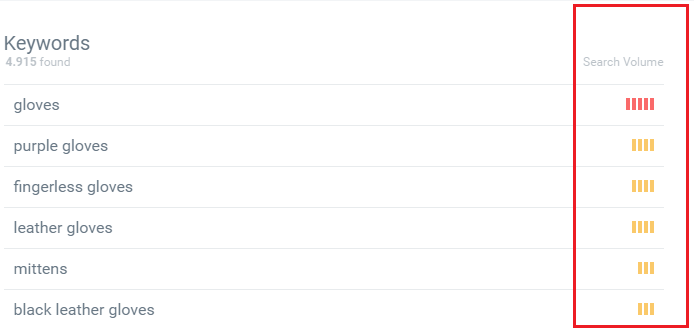
- Use Sonar (free Amazon keyword tool) to pick the top 20-50 keywords for your Exact keyword group. The keywords displayed in Sonar are pulled from real search terms used by Amazon customers, so it’s an excellent resource for finding relevant keywords. You can sort keywords by search volume, allowing you to prioritize the most relevant keywords for your product.
- Don’t skimp on your default bid. You do not want to be outbid on the keywords in your Exact Ad Group— these are the keywords that are converting extremely well for your product. Using the formula in Step 1, bid aggressively by using the full default bid amount.
Setting up a broad keyword group
For your Broad keyword group, Amazon will match your ad with your selected keyword (in any order) and variants of your keyword.
Broad ad keywords are powerful in connecting your ad to less obvious searches you may have missed with Exact. At the same time, Broad comes with the risk of bidding on slightly less relevant phrases that drive fewer conversions.
To balance these pros and cons, here are a few tips for selecting Broad keywords and bids:
- Bid slightly less on Broad keywords. We recommend deducting 20% – 30% from the default bid calculation in Step 1 for Broad keywords. With this small decrease, you still have a chance of winning Broad keyword auctions — but you also won’t lose too much if you end up bidding on less successful keywords.
- Watch out for overlapping keywords. Some sellers like to use both Broad and Exact groups for a product to increase its exposure even further. If you’re doing so, watch out for bidding on the same keywords with your Broad campaign. You’ll want to add the Exact keywords to your Broad group, but only to match with the general, inexact keywords. After all, you’re already bidding on the exact keyword in your Exact group.
To avoid bidding on the same keywords, add your Exact keywords to ‘Negative Exact’ in your Broad Ad Group. You can find the Negative Keywords section by clicking on your Campaign — it’s the second tab underneath your campaign title.
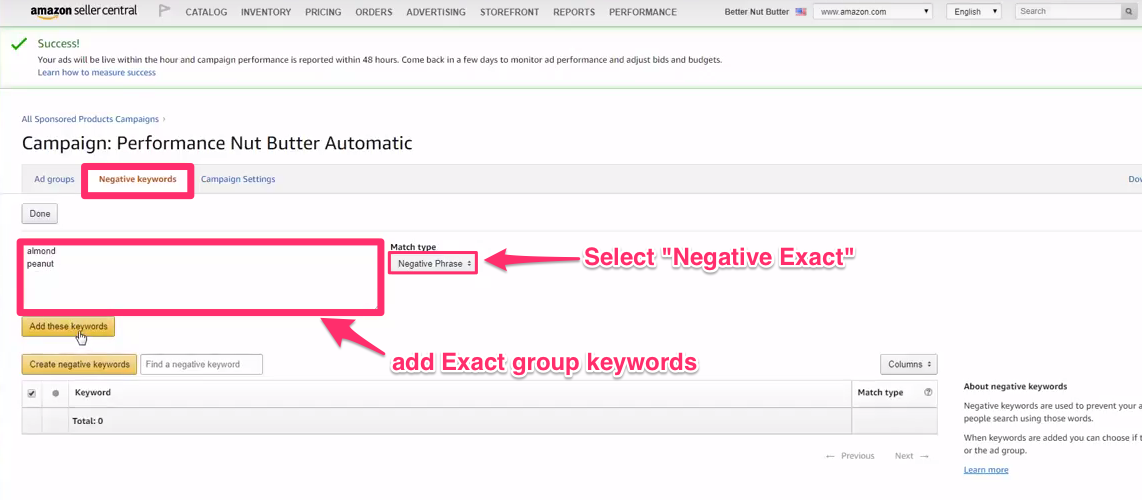
[Source]
This small, easy trick keeps your campaign cost-effective by preventing you from paying for the same keywords twice.
Once you understand these keyword strategies, you can quickly and easily set up a manual PPC campaign. In 15 to 30 minutes, you can create and launch an ad that’s powerfully targeted with your chosen keywords.
Step 4B: Setting up an automatic PPC campaign
An automatic campaign can be completed in even less time than a manual one, and it requires zero keyword research to complete. Instead of adding in keywords you want Amazon to match your ad with, Amazon matches your ad with searches by pulling information from your product info.
To get started, select Automatic as the targeting option on the Campaign Settings page mentioned in Step 2, and press “Continue to next step.”
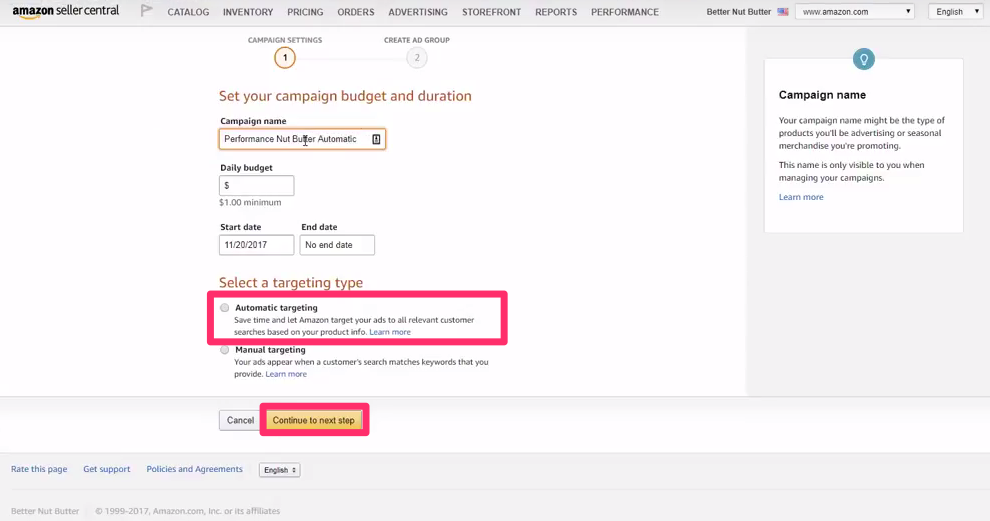
[Source]
From there, the process is simple — just name your ad group, select the products you want to advertise, and enter a bid amount.

[Source]
If you’re also running a Manual campaign for this product, it’s best to reduce your default bid for your Automatic campaign. Though they’re a wonderful time saver, Automatic campaigns aren’t as valuable as Manual campaigns because their targeting is less precise. We recommend reducing your Automatic default bid by 30-40% if you’re also using Manual.
Once you’ve set your ad group, products, and default bid, click “Save and Finish” and voilà—you’re done!
Saving you tons of work, Automatic campaigns are a great option when you have little time to set up an ad and do keyword research.
Step 5: Track your Amazon PPC ads
Setting up your Manual or Automatic Amazon PPC campaign is just the beginning. Afterward, you’ll want to track the performance of your campaigns to make sure you’re making the most of your advertising budget.
To monitor your PPC ads, visit the “All Sponsored Products Campaigns” page in the Advertising section of Seller Central. From there, you can track your ads’ cost-effectiveness with the Spend, Sales, and ACoS metrics. You can also adjust the start date, end date, and daily budget of your campaigns, even after they’ve been launched.
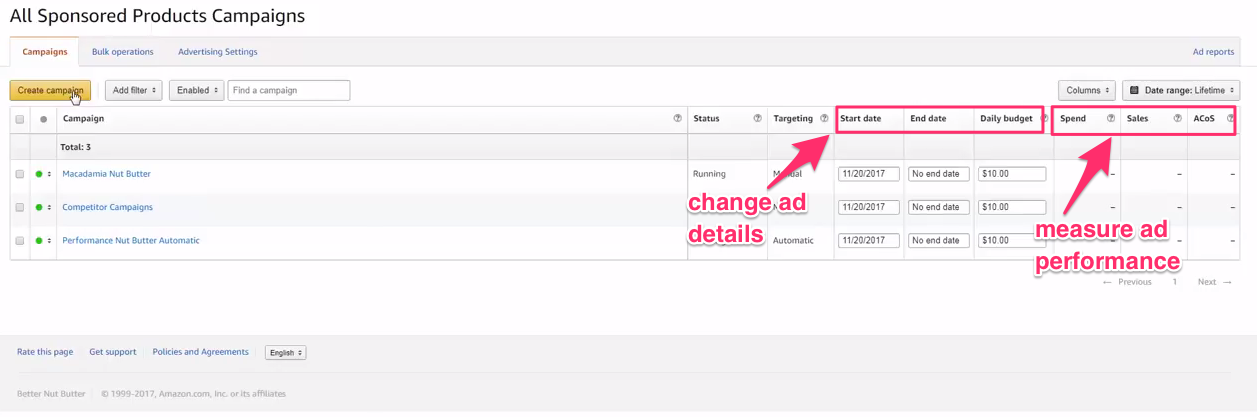
[Source]
You’ll also want to review the performance of your ads’ keywords to determine which ones convert to the most clicks and sales and should be used in future campaigns. You can check your keyword performance metrics by visiting the “All Sponsored Products Campaign” page, selecting a campaign, selecting an ad group, and viewing the Keywords subsection.
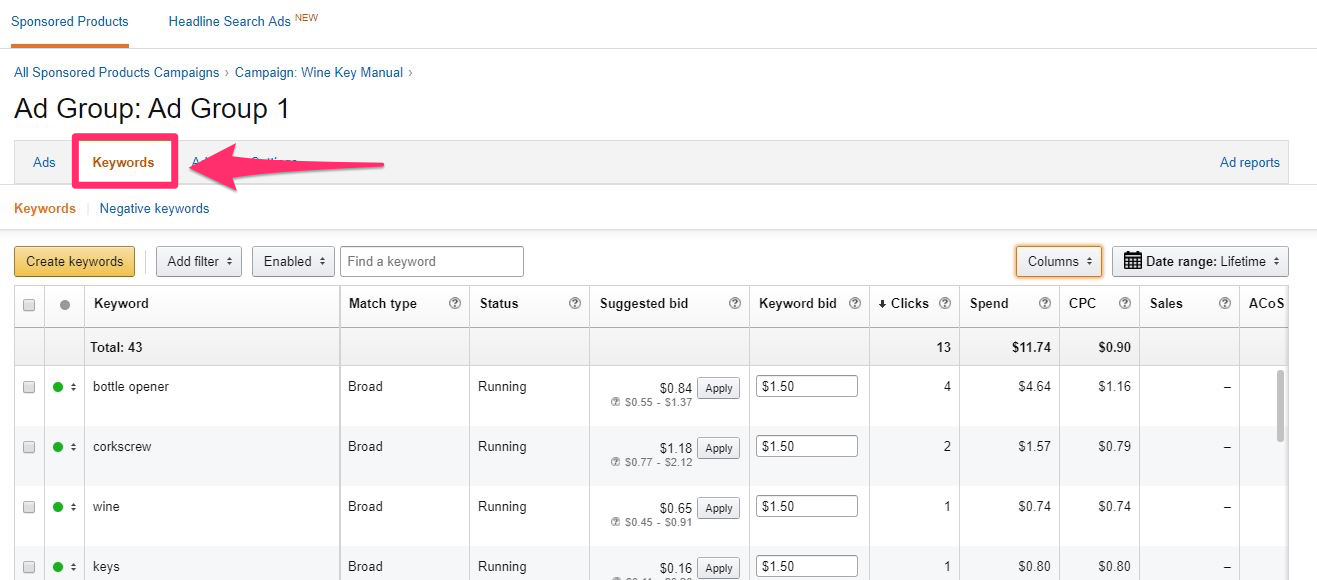
[Source]
Reviewing the performance of your ads and keywords gives you control over your ad spend. It provides the insights you need to ensure your campaigns are leading to greater product exposure and sales.
Boost your business with Amazon PPC
On Amazon, it’s not enough to sell a great product — there’s simply too much competition to rely on your merchandise’s quality for sales. You have to find a way to make your product highly visible to attract buyers in this crowded marketplace. The easier it is to find your items, the more likely it is you’ll make a sale.
Amazon PPC advertising is the key to achieving product exposure. By bidding on keywords, you have control over whether you’ll rank high in product searches. PPC is an added cost to your budget, but mindfully creating and managing your campaigns with this guide will keep your advertising cost-effective, leading to greater product exposure and sales.
Note: This article was originally written by guest author, Franz Jordan in 2018. We updated this post so the words here may not entirely reflect Franz’s specific authorship and thoughts.