
Those who know a little about ecommerce know that Google product categories are mostly optional. Those who know a lot about ecommerce, know they’re anything but.
Google indexes billions of web pages comprising 100,000 terabytes of data. Without accurate or optimized category data, your product can disappear like a needle in a barnful of haystacks.
Ecommerce retailers must not only become masters of Google’s taxonomy; they must fill out and optimize the data feed they’re sending to Google in order to stay competitive in a market of infinite options. This guide will take you through Google Shopping optimization step-by-step and help you make the most of your advertising dollar.
#1. Create a Google Shopping Campaign
If you already have a Google Shopping campaign and are just looking to learn more about categories, feel free to skip to section 2. If not, we’ll walk you through the basics of creating your Google Shopping campaign.
Step 1: Link your product data to your advertising account. If you’re starting from scratch, your first job is to create a Google Ads account and a Google Merchant account and then create a link between them.
Step 2: Check Google’s requirements for Google Shopping eligibility. Next, you’ll need to figure out if your product or ecommerce site violates Google’s policies. Products that may be deemed inappropriate, dangerous, dishonest, or counterfeit are obviously not allowed. Alcoholic products, adult products, gambling services, and healthcare products are also heavily regulated with regard to how the products are presented.
Google will also veto any ecommerce site it feels is collecting data in an irresponsible matter, so make sure all of your data privacy and data security policies are up to date with current laws and best practices.
Step 3: Create a Shopping campaign in Google Ads. Go to your Google Ads account, then to the Campaigns section, and then “Create a New Campaign” with the “Shopping” type. The prompts should guide you through the rest. You’ll fill out the campaign name, merchant account, country, daily budget, campaign priority, bid, etc. When you’re done, press “Save” to launch your campaign.
The Google Shopping ad is only the first step in the process. The next step is to use Google’s taxonomy (naming conventions) to categorize your products, so they can be more easily found by matching buyer search terms. This can be done in the “Product Groups” section of your Shopping ad settings, which allows you to subdivide your products into groups and manage product categories.
#2. Learn the Difference Between Google Product Categories and Product Type
A Google product category and a product type are two different attributes, and knowing what they’re for and how to use them can get your product in the hands of consumers faster.
What is a Google product category? A Google product category is what Google uses to classify an item in its official taxonomy. Google uses a breadcrumb-like string to create subcategories to hone in on and index your product(s) more efficiently. These categories and subcategories already exist in Google’s system, but you have the option to customize your own. If you choose to customize this attribute, you can only put a product in one category at a time.
In the example below, the product category is Clothing & Accessories > Clothing > Dresses. And that product — skater dress — can live only in that category.
What is a product type? A “product type,” on the other hand, uses your own product attribution terms. If you find Google’s taxonomy doesn’t quite cover the keywords you create or use for your products, you can cover the gap with the product type. Format your product type in the same breadcrumb-like style: Automotive > Struts and Shocks > Lift Supports, for example.
The idea behind the product type is to get the keywords you use into your shopping feed to further define and categorize your product.
Here is what the product type attribute looks like in a data feed:
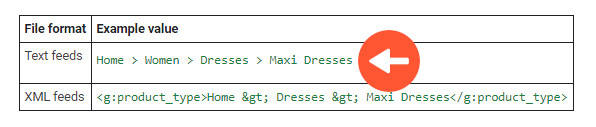
The product type data is limited to 750 characters, so keep it relevant and succinct. Consider using Google’s Keyword Planner to figure out the most relevant and searchable terms for your product and include those terms in the product type.
#3. Put Every Item You Sell in a Google Product Category
Google product categories are semi-optional — you can sell products without defining them — but you really shouldn’t. Finding the perfect product category is vital for standing out in the crowded world of Google Shopping.
Google will automatically categorize your product if you do nothing. However, because most products could easily fit into two or more categories, there’s no guarantee that Google’s crawlers would place your product in the most effective category for SEO or your branding or marketing plan.
Finding the correct and most effective Google product category (out of over 6,000 pre-existing categories) can be a skill on its own, and it involves a strong knowledge of both Google taxonomy and your own product market. It’s made more difficult by the fact that the product categories change per country, and new product categories are added frequently.
Google provides a massive .txt file for English-language Google product categories that can help you find your most appropriate category. You can download it or copy it into a spreadsheet for your own use. Once you download the file, a “Ctrl+F” of your keywords can help you find the right category for you. Searching like this is particularly helpful if you only sell a few products.
A large product catalog can be more complicated to fill out and sort, but there are ways to streamline and even automate the categorization process based on your preferences. We’ll walk you through how to do this with your entire data feed in step 5.
#4. Create a Compatible Data Feed
Everything from the name of your product to its category, description, type, and price (among other factors) make up your product data feed. You might see this referred to as your “data feed,” “shopping feed,” or your “product feed,” but it’s all the same thing. Basically, it’s every piece of information you give to Google about your product.
Choose a data feed format that fits the size of your product line.This data feed is a file (.txt or .xml) in which an ecommerce website’s entire catalog of products is organized into attributes that Google can grab and sort. Small businesses or businesses that sell only a few items can easily submit a .txt file and be on their way. Large businesses with hundreds or thousands of products or models will want to create a spreadsheet.
A data file in .txt format will look like this:

A data file in .xml format will look like this:

You build these files with a spreadsheet editor of your choice or use the template and instructions that the Merchant Center provides. Celebird also creates templates for specific product categories that can be extremely useful.
Sync your data feed submission with your website update. Submitting your product data feed isn’t a one-time process — your data feed should change with the product price, availability, feature changes, and, of course, the addition of new products. Whenever you update your website (hourly, daily, weekly, etc.) with this information, you should also submit a new data feed document pulled from your own database. It will only take the Merchant Center (and Google Shopping) a few minutes to sync these changes to your Google Shopping ads.
Syncing can be done manually, but having a complex product line or one that changes frequently could get tedious. Earlier, we talked about automating the categorization process: Google also provides a Content API for handling complex data feeds.
#5. Automate Your Product Feed with Precise Product Data
Popular SEO company SEMrush found that Google Shopping often gives its clients a 600% (or higher) return on their advertising dime, which is why accurately filling out all data feed attributes is such a useful time investment. But for ecommerce sites with a wide spread of products, entering that data manually isn’t feasible. That’s where automation comes in. Google’s Content API is a powerful tool, in particular, if you work with a developer with knowledge of Python.
Creating your product data feed involves filling out the following attributes for every single product in your catalog, which includes (but is not limited to) the following:
Product Title – The name of the product
Product Category – The Google-approved keyword trail for your product
Description – A short, evocative, and keyword-filled description of the product
Pricing – The current, most accurate pricing — as this is apt to fluctuate, automation is a smart move for larger companies
GTIN Info – The unique 14-digit number that defines your product internationally
Brand Name – The manufacturer/producer of the product
Link – Link to the product
Image Link – A photo of the product
Availability – Is there inventory in stock
Expiration Date – For perishable items
There are about a hundred more attributes to fill out, depending on the kind of product you’re dealing with. Again, filling out these attributes is feasible for niche companies, but with a product line even in the dozens, it would turn into a chore very quickly. And a company with hundreds (or thousands) of distinct products is going to drown without a little help.
Google’s Content API can save your company some of the hassle. Google’s Content API for Shopping is designed to work with the Merchant Center, automating everything from product management to data feed scheduling and regional shipping/tax concerns.
Start with the API Explorer, available from your Google account. Then, allow the API Explorer permission to manage your listings for Google Shopping.
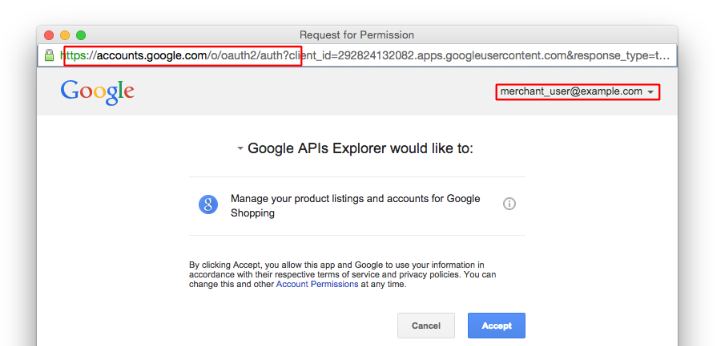
In the Merchant Center, go into the Settings menu (the icon with three dots) and select “Content API” from the dropdown. Then, from the Authentication section, create a new API key with the menu provided. After agreeing to download the JSON file, you’ll gain a service account key (a unique key best kept in a safe place) that you can use to begin programming in Python.
Developers will then be able to execute Python scripts on their Google Merchant account. Scripts can grab all of the requisite data from your own website to create a data feed that can automatically update with price changes or other product alterations in real time (no matter how large the database).
Setting Up Your Product Categories Is Only the Beginning
Even if you’re confident in all of your Google product categories and product attributes, you must monitor your campaigns to make sure they’re working effectively and making the most out of your ad budget.
In the Product Groups section of your Google Ads account, you can run reports on click-through rates and impressions for your Shopping Ads. You can (and should) run reports based on specific attributes as well, including category, type, and any other attributes you’d like to check the performance of.
Socrates said, “the unexamined life is not worth living,” and if we could borrow and paraphrase that wisdom: the unexamined Shopping campaign isn’t worth running.
Tuning your Google product categories and your entire product data feed will make each ad dollar go further, make each click more relevant, and put your product in the hands of interested parties faster.
